Using ICE with Keyboard Functions
The keyboard can be used to navigate around the ICE Business System to activate functions, select menu items, open windows and move the cursor between fields when processing data.
Users that are used to fast processing of data will often prefer the use of keyboards as it is much quicker to move around the system once the key strokes are familiar.
A keyboard template can be downloaded.
Cursor Focus
The focus of the cursor is the position of the cursor after it is moved (by keyboard or mouse) to an object (place or item on the desktop, menu, window or field) within the ICE Business System.
When using the keyboard to move between fields, activate functions and/or actions it is critical to understand the importance of the cursor focus, because depending on where the cursor is the quick keys and function keys will perform different functions.
The cursor focus is highlighted differently depending on what “object” (field, window, tab) is highlighted.
Below are some examples of cursor highlights that occur throughout the ICE Business System.
|
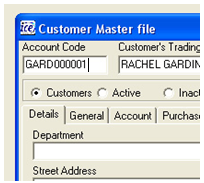
The cursor located at the end of a standard edit field (normally the cursor is blinking) is indicated with a vertical line.
Characters entered whilst the cursor is in this position at this time will append to the existing field information.
|
|
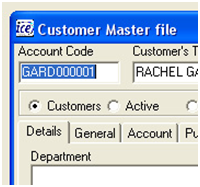
The cursor that has been moved to a field using Tab, Shift + Tab or double click on a word, the whole field or word is highlighted.
Characters entered whilst the cursor is highlighting a word/s will overwrite the existing field information.
To keep the existing information and either edit or append more characters, use the ç or è arrows to change the cursor focus.
|
|
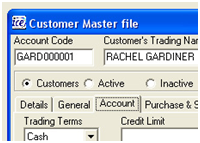
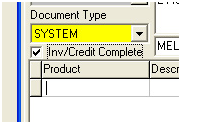
A cursor moved to a search field using Tab, Shift + Tab or by clicking on the field.
All information in the field is highlighted.
To change the content select use the search arrow.
|
|
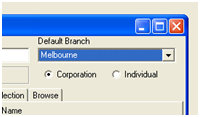
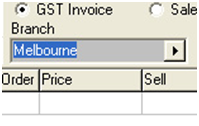
A cursor highlighting a radio button option, the field name is highlighted with small dots around the description.
Use the ç or è arrows to change the cursor focus to another radio button option.
|
|
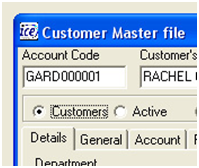
A cursor highlighting a Tab option, the tab name is highlighted with small dots around the description.
Use the ç or è arrows to change the cursor focus to another tab or use the Tab key to move to fields on the Tab.
|
|
A cursor highlighting a button option, the button name is highlighted with small dots around the description.
Use the Enter key to activate the button option.
|
|
The cursor is located in an empty search field is indicated with a vertical line (the cursor is normally blinking).
To select an item for the field press Enter key or click on the search arrow to activate the search dialog.
|
|
A cursor highlighting a checkbox option, the field name is highlighted with small dots around the description.
Use the Space Bar to change the status to selected or unselected.
|
|
A cursor moved to a search field using Tab, Shift + Tab or by clicking on the field.
The word in the field is highlighted and the background of the field is grey.
To change the content, use the Search arrow or the Page Down key to activate the search dialog or press the Enter key.
|
|
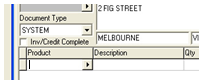
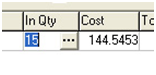
A cursor highlighting a field in a Point of Sale transaction line, the field is highlighted with small dots around the outside of the field entry box.
Begin typing data or press to enter information in the case of the field displayed “Stock Code”.
|
|
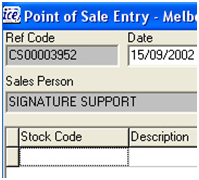
The cursor is located in an empty transaction line is indicated with a vertical line (the cursor is normally blinking).
|
|
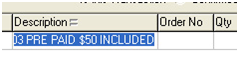
A cursor highlighting a field in a transaction line.
Characters entered whilst the cursor is highlighting a word/s will overwrite the existing field information.
To keep the existing information and either edit or append more characters, use the ç or è arrows to change the cursor focus.
|
|
A cursor is located in a transaction line search field with the ellipse (3 dots at end of field).
The contents of the field are shown highlighted and typing whilst the data is highlighted will overwrite the data.
To keep the existing information and either edit or append more characters, use the ç or è arrows to change the cursor focus
|
Quick Keys
Below is a list of “Quick Keys” available, where two keys are required to be pressed together the “ + “ symbol is used.
Key Stroke
|
Function
|
Alt +
|
Alt + the letter underlined on the main menu takes you up to that menu.
Type the letter underlined on a menu item to make your selection.
|
Tab
|
Moves the cursor to the next field in the tab sequence.
|
Shift + Tab
|
Moves the cursor to the previous field in the tab sequence.
|
ç
|
Use with cursor on Tab Headings or radio buttons to move to the next option (tab or radio button.
|
è
|
Use with cursor on Tab Headings or radio buttons to move to the next option (tab or radio button.
|
Ctrl + R
|
With cursor on a search window (field with arrow on right hand side of window pointing to the right), “Ctrl + R” will open the search dialog for the field
(same as F8).
|
Ctrl + G
|
With cursor on a search window (field with arrow on right hand side of window pointing to the right), “Ctrl + G” will open the create window for the field
(same as F7).
|
Ctrl + Y
|
Change the working company.
|
Ctrl + U
|
Change the login of the current user.
|
Ctrl + L
|
Lock the use of the ICE system by requiring a username and password to re-open the main window and continue using the system.
Failing to enter a valid username and password will close the system.
|
Function Keys
The keyboard function keys located across the top of a standard keyboard (F1 to F12) can be used throughout the ICE Business System in conjunction with the Quick Keys, in some cases the function keys work in conjunction with the Ctrl, Alt or Shift keys and where the combination of these keys and a function key is required the “ + “ symbol is used.
The function keys in some cases also relate to menu items or speed buttons, therefore these have also been listed where applicable.
Ensure the cursor focus is highlighted correctly before using the function keys. Below are some tips on using the function keys for transactions.
Using the Function Keys with ICE Windows
Normal status of the function keys indicates the function that the key performs without a combination keystroke using Shit or Ctrl keys. The function key will be activated based on the cursor focus at the time it was activated.
Transaction Header for example is the first part (the header part) of the invoice and includes unique information to the invoice. This includes all the customer information e.g. customer name and number, invoice number, order number. To work with a transaction header ensure the cursor focus is in one of the header fields to achieve the desired result (ie insert, save or delete a headers). If when pressing the function key a line is highlighted, press F11 to cancel, move the cursor to a field in the header area and press the required function key again.
Transaction Lines are multiple details of an invoice e.g. transaction lines on invoice, inventory items, accessories on equipment. To insert lines ensure the cursor focus is in the line grid to achieve the desired result (ie insert, save or delete a line). If when pressing the function key the header is highlighted, press F11 to cancel, move the cursor to the line area and press the required function key again.

•
|
For a transaction record, when selecting a function for the transaction header use Shift with the Function Key. e.g. Shift + F9 Inserts a header or Shift + F10 will save a header transaction.
|
•
|
If, when pressing the function key, the wrong area is highlighted, press F11 or Shift + F11 to cancel, move the cursor to the correct area and press the required function key again.
|
Keyboard Templates
Click on the image below to download a MS Word document containing the Keyboard Template:
Ctrl + Shift +
|
|
Activate Search
|
Clear or Cancel Search Criteria
|
|
Ctrl +
|
|
|
|
|
|
|
|
|
|
|
|
|
|
|
|
|
|
|
Ctrl + Shift +
|
Go To First Header
|
Go To Last Header
|
|
Search record in lookup table
|
Ctrl +
|
Go To First Record
|
Go To Last Record
|
|
Shift +
|
Go To Previous Header
|
Go To Next Header
|
Create A Header
|
|
|
|
|
|
|
|
|
|
|
|
|
|
|
Ctrl + Shift +
|
|
|
|
Retrieve / Data based on Search Criteria
|
Ctrl +
|
|
Post Record & Close
|
Cancel Record & Close
|
Shift +
|
Insert A Header
|
Post Header
|
|
|
|
|
|
|
|
|
|
|
|
|
|
|
|
|
